Demo program for Dublin Jerome High School Computer Science Club. Includes instructions for recreating hardware configuration and documentation of program.
-
The following parts are needed:
- Arduino MEGA 2560 (any other Arduino should work, though)
- Breadboard (minimum of 33 rows)
- USB-A to USB-B cable (for uploading program to Arduino)
- 19 male-to-male cables
- 16x2 LCD (HD44780 chipset)
- 3 1k Ohm resistors (optional - increases longevity of display)
-
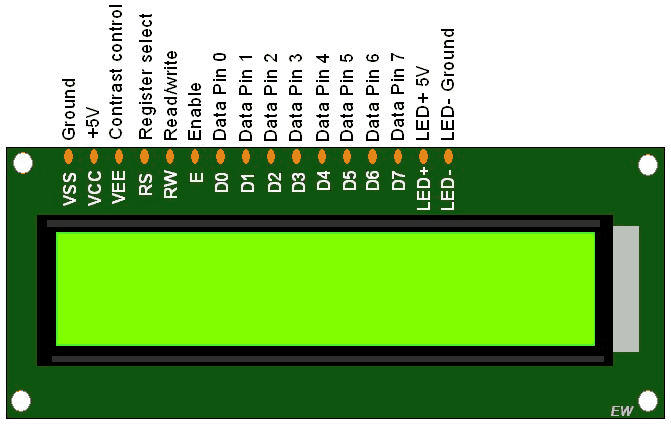
Use the image below to connect the LCD according to the following instructions:
- Ground -> Ground
- +5V -> 5V power
- Contrast control (VE) -> Pin 2
- Register select (rs) -> Pin 3
- Read/Write (rw) -> Pin 4
- Enable -> Pin 5
- Data 0 -> Pin 6
- Data 1 -> Pin 7
- Data 2 -> Pin 8
- Data 3 -> Pin 9
- Data 4 -> Pin 10
- Data 5 -> Pin 11
- Data 6 -> Pin 12
- Data 7 -> Pin 13
- LED +5V -> 5V power
- LED negative -> Ground
-
Connect the potentiometer - you will have to look up the pinouts for your particular model:
- 5V -> 5V
- Signal -> Pin 14
- Ground -> Ground
-
Download and install the Arduino IDE (direct link) on a laptop
-
Download the file lcdDemo.ino or clone this repository
-
Open lcdDemo.ino using the Arduino IDE
-
Open the serial monitor and set the line ending to "No line ending"
-
The demo is ready for use!
The potentiometer can be used to control the LCD contrast while the useSerialNumbers flag is set to false. The useSerialNumbers flag is set to true when a positive integer is entered into the serial monitor and reverts to false when -1 is entered into the serial monitor. useSerialNumbers is false by default.
LCD contrast can be set over serial by entering any positive integer into the serial monitor. Some values will result in nothing displaying on the LCD. After setting the contrast over serial, the potentiometer will not do anything. To use the potentiometer again, enter -1 into the serial monitor.
The LCD's first line of text can be changed using serial by entering -2 into the serial monitor. Enter the new text (max 16 characters). A "..." pattern will appear on the LCD while the new text is being entered. If the new text does not appear, make sure that the line ending is set to "No line ending." When the Arduino starts again, it will revert to the default text.