A sleek, high-performance Chrome Extension for managing your tasks directly in the side panel. Built with a focus on speed, premium aesthetics, and a seamless user experience.


▶ Click to watch the demo (YouTube)
- Smooth Management: Add, edit, delete tasks.
- Drag & Drop: Rerrange tasks using drag & drop, and move them to folder.
- Deep Nesting: Create subtasks within any task to break down complex projects.
- Multi-Select Drag & Drop: Select multiple tasks using
Ctrl/Cmd + Clickand move/delete them as a group. - Smart Sorting: Active, uncompleted tasks are automatically pinned to the top for better focus.
- Context Actions: Convert a task (with its subtasks) into a full folder directly from the context menu.
- Grid Layout: View and organize your major categories in a clean, visual grid.
- Drag & Drop: Reorder your folders within the root view to prioritize your workflows.
- Isolated Views: Dive into a folder to focus solely on its tasks and subtasks.
- Local Search: Fast, specific search that filters only within the current folder.
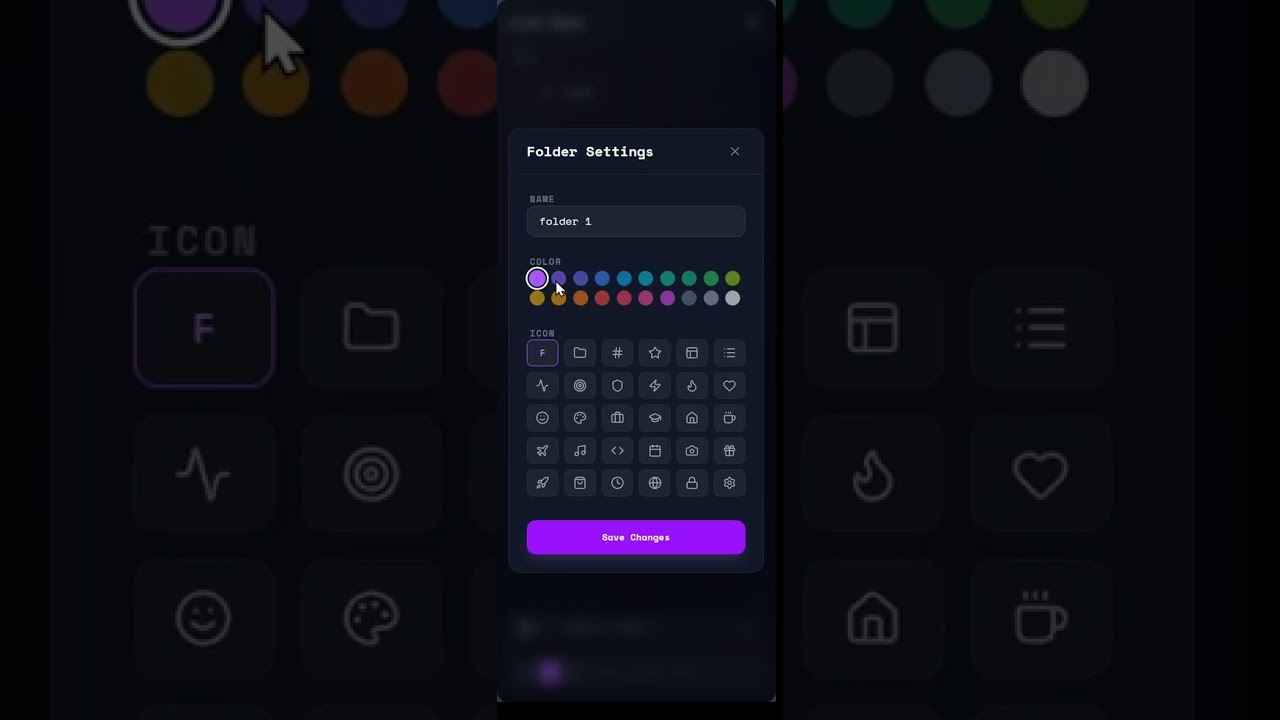
- Customization: Adjust folder colors and icons to match your preferences.
- All-in-One Field: A single, context-aware input area for all your creation commands.
- Task Mode: Default mode to create new tasks.
- Subtask Mode: When a task is selected, the input automatically switches to "Subtask" mode.
- Folder Mode: Toggle the folder icon to create new high-level categories.
- Global Search: When in root view, search across your entire workspace (including nested tasks) with real-time results.
- Folder Search: When in a folder view, search only within the current folder.
- 10-Step Undo Stack: A persistent history of your recent actions to easily recover from mistakes.
- Global Shortcuts: Copy, paste, undo shortcuts support.
- Glassmorphism UI: High-fidelity sci-fi design.
- Fluid Animations: Smooth transitions and vertical expansions powered by Framer Motion.
- Local-First: All data is stored securely on your machine via
chrome.storage.local.
To install List Dock in your browser:
- Download the Latest Release: Head to the Latest Release page and download the
list-dock.zipfile. - Unzip the file: Extract the contents to a folder on your computer.
- Load in Chrome:
- Open Chrome and navigate to
chrome://extensions/. - Enable Developer mode (top right toggle).
- Click Load unpacked.
- Select the folder you extracted in step 2.
- Do not delete the folder after loading.
- Open Chrome and navigate to
- Toggle Sidebar: Click the List Dock icon
 in your browser toolbar.
 - Bulk Actions: Select multiple items with
Ctrland drag them to reparent or reorganize. - Accidental Deletions: Hit
Ctrl + Zor use the toast notification undo button. - Clear Selection: Click any empty area to deselect the current task/folder.
- Smart Paste: Copy any list from a text editor and paste (
Ctrl + V) directly into the sidebar to auto-generate tasks and subtasks.
| Shortcut | Action | Description |
|---|---|---|
Ctrl + Z |
Undo | Recover deleted items or revert your last action (up to 10 steps). |
Ctrl + C |
Copy | Copies selected task names. If enabled in settings, includes all subtasks in a formatted list. |
Ctrl + V |
Smart Paste | Paste text to auto-generate tasks. Supports markdown, bullets, and indentation for subtasks. |
Ctrl + Click |
Multi-Select | Select multiple tasks or folders for bulk moving or deletion. |
Shift + Click |
Range Select | Select a range of tasks between the last selection and the current click. |
Esc |
Deselect | Clear all current selections. |
- Core: React 19, TypeScript
- Build: Vite + CRXJS
- State: Zustand
- Styling: Tailwind CSS 4
- Animations: Framer Motion
- Icons: Lucide React
- Search: Fuse.js
- Toasts: React Hot Toast
Follow these steps to set up the project locally for development:
-
Clone the Repository:
git clone https://github.com/MatrixRex/List-Dock.git cd List-Dock -
Install Dependencies:
pnpm install
-
Run Development Server:
pnpm dev
This will generate a
distfolder. -
Load in Chrome: Follow the Installation steps but select the
distfolder instead of an unzipped release.
The project includes an automated release system that handles versioning and creates GitHub releases with the compiled extension.
To start a new release, run the following command and follow the interactive prompts:
pnpm releaseThis wizard will:
- Update the version in
package.jsonandmanifest.json. - Create a new git tag formatted as
vX.X.X. - Push the changes and the tag to your GitHub repository.
Once a tag following the v* pattern (e.g., v1.4.0) is pushed, a GitHub Action (.github/workflows/release.yml) is automatically triggered. This workflow:
- Installs dependencies and runs the production build.
- Packages the
distdirectory into alist-dock.zipfile. - Creates a new GitHub Release with the zip file attached and auto-generated changelogs.
If you have forked this repository and want to use the automated release system for your own versions:
- Enable Actions: Go to the Actions tab of your forked repository and click the button to enable workflows.
- Configure Permissions:
- Navigate to
Settings > Actions > General. - Scroll down to Workflow permissions.
- Select Read and write permissions. This is required for the action to create the release and upload the asset.
- Check Allow GitHub Actions to create and approve pull requests (optional but recommended).
- Navigate to
- Verify Tags: Ensure your tag pushes include the
vprefix to match the workflow trigger pattern.
Contributions are welcome! If you have a feature request, bug report, or want to contribute code:
- Fork the Repository.
- Create a Feature Branch (
git checkout -b feature/AmazingFeature). - Commit Your Changes (
git commit -m 'Add some AmazingFeature'). - Push to the Branch (
git push origin feature/AmazingFeature). - Open a Pull Request.
Please ensure your code follows the existing style and includes proper documentation for new features.
This project is Open Source and available under the MIT License.