Home

When you first start a new AFF World, you will first see the splash screen with the legal information. To continue, simply click on the “Play” button. You will see this each time you restart or load the World.
Once you enable the AFF Module(s) and the system restarts, you will see a box with some information about the modules you have, and these can be closed (once you have read them!)
You will then see a pop-up box asking you if you want to Update the World to AFF. If you click on Yes, the login image is changed to an AFF image.
Lastly, you will see boxes for any optional content (usually adventures) contained within the Modules. At the bottom of each of these is an “Import Adventure” button to load the Actors, Scenes, Monsters, Items and anything else for that adventure. You can import these now, or if you want to import them later, simply go to the appropriate Compendium folder, go to “Adventures” and click on the adventure you want to import, and then the “Import Adventure” button.
To create a new AFF Hero, the Director should navigate to the Actors Tab and click on the “Create Actor” button at the top. This will pop up a new Dialogue box. In here, type the name of the new Hero and make sure that “Hero” is selected in the drop down box. Then, change the Ownership of the new Hero to the appropriate Player.
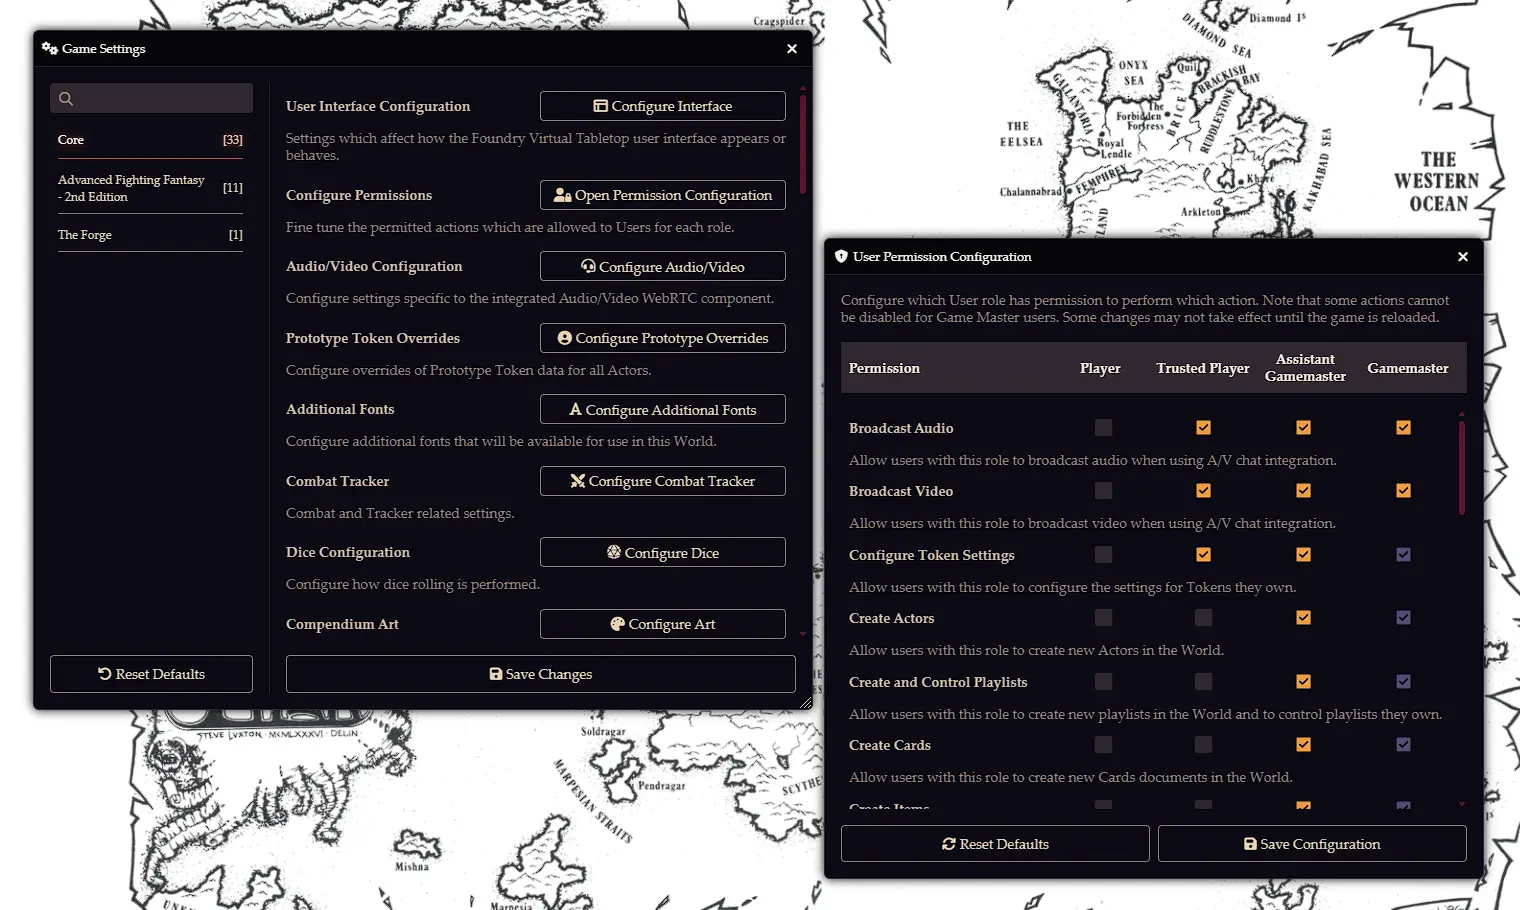
Note: To allow a Player to create their own Hero, go to the Settings Tab > Configure Settings > Open Permission Configuration and make sure that for the “Create Actors” option, the box is ticked for Players or Trusted Players.
On the left hand side of the sheet, below the portrait, you will find space for a single line description of the Hero (Barbarian Warrior, Elven Sorcerer etc), for the Race, Social Class, Age and Sex. You can enter these simply by clicking on that space and typing the desired text or value.
SKILL, STAMINA, LUCK and MAGIC should be entered in both the Initial and Current fields for each characteristic.
To minimise the sheet, place the pointer over the header bar such that you see an Open Hand icon. Double click, and the sheet will be minimised to a small header bar with only the name of the Hero. To restore the sheet, double click again on the header bar.
You can roll a single d6 by clicking on the single dice icon in the header bar, and 2d6 by clicking on the double dice icon. When Hero creation has been completed, click on the three dots in the header bar and choose “Calculate Magic Points”. This will calculate how many MP the Hero should have, but be aware that it will set the Current points to full, and will not take into account Experience, so should only be used at the end of Hero creation.

To change the portrait for the Hero, click on the portrait space and select an Image in the usual Foundry way. Similarly, to assign a token image, click on the three dots in the header bar, choose “Prototype Token”, and on the appearance tab, choose the image in the “Image Path” field.
*Note: You can drag a Hero Sheet from the list in the Actors tab to the Macro bar to make it easy to open. However, to allow the Player to do this on their own screen, the Director must first do this, and then navigate to the Macro tab. There will be a Macro with “Display *****” and the name of the Hero. The Director should right click on the appropriate Macro, choose the “Configure Ownership” option and then change the appropriate player to “Owner”. The player should then see the Macro on their own tab, and be able to drag it to the Macro Bar.
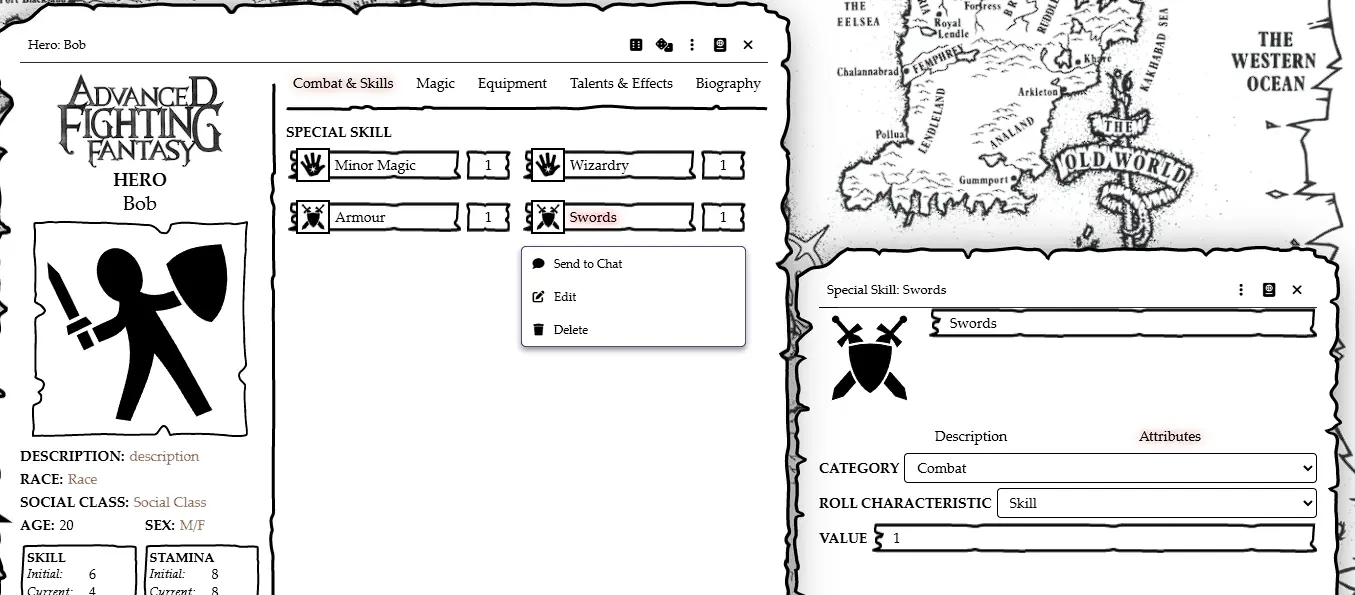
There are five Tabs on the Hero Sheet, but whichever one you are on, the left hand panel with the portrait and Characteristics is visible. The active Tab has its title highlighted in red.
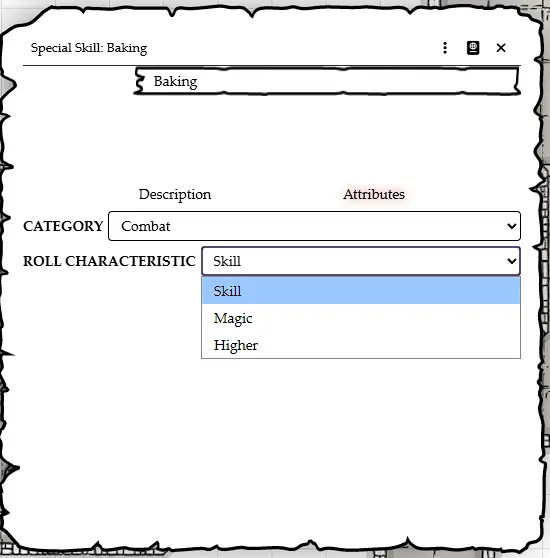
This area is used to list the Weapons, Armour and special skills possessed by the Hero. To add a new special skill, go to the Compendium Tab, click on the “Core Book” compendium and a new window with the special skills (arranged into categories) will appear. Drag the desired special skill onto the open area of the Tab and the special skill will be added with a default value of 1. The Characteristic used will be auto set to SKILL or MAGIC as defined by the rules, but can be changed manually by right clicking on the special skill and choosing “Edit”. There are two tabs on the window that pops up. “Description” gives you the book definition of the special skill, and the “Attributes” tab allows you to change various values. The “ROLL CHARACTERISTIC” allows you to change the default, and the “VALUE” field allows you to set the number of points the Hero has in that special skill.
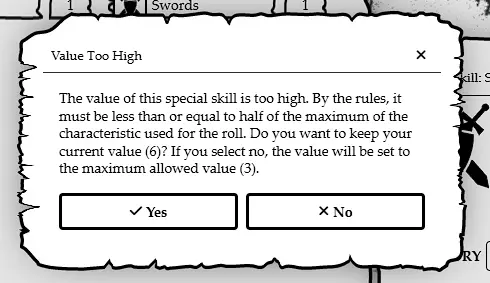
Note: The ruleset uses the Limited special skills rule from the Combat Companion that restricts the value of a special skill to half that of the defining Characteristic. If you apply a value of 6 with a SKILL of 6, a warning box will pop up to tell you that the value is too high, and gives you the option of setting it to the Limited value or over-riding that rule.
A special skill can be deleted by right clicking on it and selecting “Delete”.
Weapons and Armour added to the inventory will appear in the top part of this tab, provided that they are equipped. These items are equipped by default, but can be unequipped (see below). Weapons and Armours will have their Damage/Armour tracks listed alongside their name.
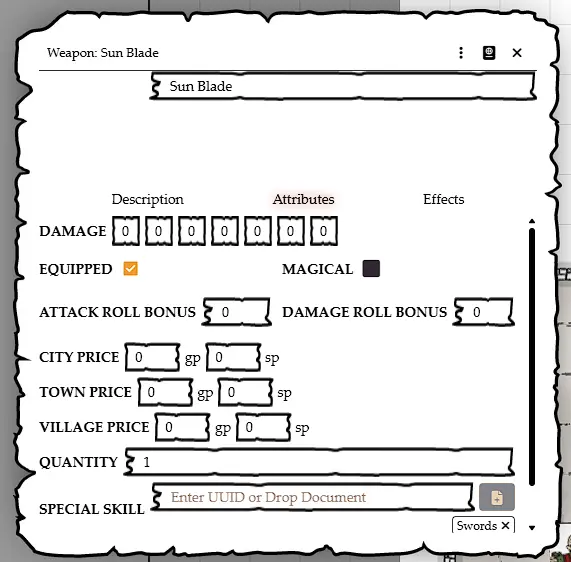
To edit the Weapon details, right click on the Weapon and choose “Edit”. There are three Tabs, “Description”, “Attributes” and “Effects”. On the Attributes Tab, you can edit the damage track, make a weapon Magical, apply a bonus to Attack total or Damage roll, define ammunition and also the associated special skill.
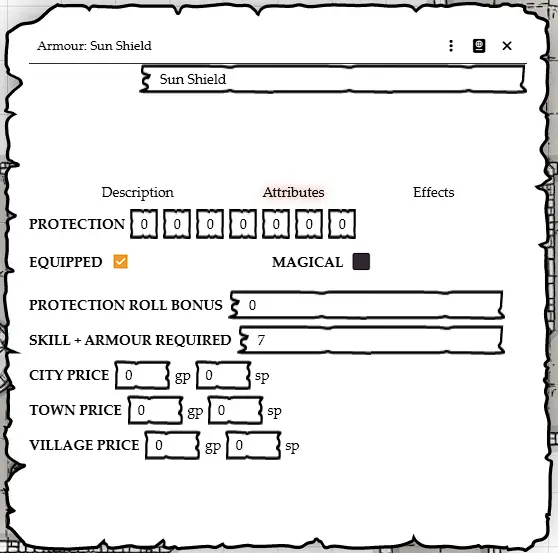
On the corresponding Tab for Armour, you can change the Armour track values, make it magical, apply a bonus to the Armour roll or change the Armour + SKILL requirement. If the Hero has worn armour and a shield, rolling Armour will roll one d6 and total the protection from both.
Details on how to use the items on this Tab during gameplay are given below.
Spells, Cantrips and Priestly powers can be added to this Tab by dragging them on from the Magic and Religion Compendium. The different types of spell or power will appear under distinct headings, with the MP/STAMINA cost in the case of Wizardry and Sorcery spells respectively.
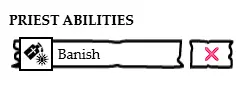
Priestly Powers by default will have a Tick in the associated box:
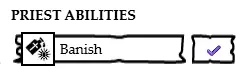
This indicates that the Power has not yet been used that day, and is available for use. Clicking on the Power “uses it”, adds the description of the power and who is using it to the chat log, and changes the tick next to the power into a red cross. That means that the power is no longer available for free use.
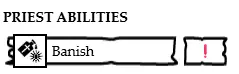
Priests do of course have the option to use a Power for a second time in a day by expending a point of LUCK, and clicking on the power again produces a dialogue box asking if the Priest wants to spend that LUCK. If Yes is chosen, the description is again sent to the chat log, and a point of LUCK is removed from the current total. An exclamation mark replaces the red cross:
Trying to click the power again produces the following warning near the top of the screen.

Power usages are restored when the Hero rests (see below) but if they possess a Talent or Item that allows a Power to be used freely more than once, the usage can be manually changed by right clicking on the power, choosing the Attributes Tab and changing the value as appropriate in the drop down box.
This Tab shows the items and equipment carried by the Hero. These can be dragged on from the “Combat Items” and “Equipment” Compendia. A “progress bar” across the top shows how full the current inventory of the Hero is. Weapons and Armour are equipped by default, and as carried weapons and worn armour do not count towards the inventory limit, these will not show on the bar. However, a Hero should only have one armour equipped at a time, and either one weapon, one weapon and a shield or two weapons (if duel wielding). Non-equipped weapons and armour will count towards inventory. To equip or unequip an item, right click on that item and choose the appropriate option. If the Hero has the Strength special skill or Packhorse Talents, these will be automatically reflected in the “available slots” of the bar. The bar will turn red if the Hero is carrying too much.
The boxes for gp and sp can simply be typed into, as can the box for Provisions. These do count towards the Inventory bar, at a rate of one hundred coins occupying one “slot”.
Next to Provisions box are two buttons: Consume and Rest
Clicking the “Consume” button reduces the Provisions number by 1, and restores 2 to the current STAMINA score. A Hero can only do this twice in a single day, and trying to do so a third time will only produce a warning box:

Clicking the “Rest” button will restore 4 to the current STAMINA score, but will also reset the ability to consume Provisions and also reset all Priestly Powers.
The Treasures box is a simple text box where a Hero can record non-inventory treasures. The text can be entered by clicking the little box and pen icon that appears in the corner when a pointer is in the box.
At Hero creation, this Tab is mainly used to record the Talent(s) chosen or assigned. These should be dragged in from the Talents section of the Compendium. Some Talents will have an automatically applied effect on the Hero (such as Robust, Strongarm etc) and these will have an entry in the “Passive Effects” section of this Tab:
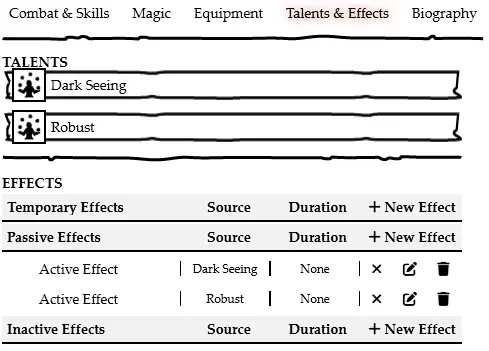
In the case of Robust, the Hero would recover more STAMINA when the “Consume” or “Rest” buttons on the Equipment Tab are pressed and in the case of Strongarm, a +1 modifier would be automatically applied to all hand to hand Damage rolls.
This Tab is a simple text box that can be accessed by clicking the little box and pen icon that appears in the corner when a pointer is in the box. This can be used to record notes, background, description and anything else the player feels is relevant to their Hero.
Note: A player can drag a Weapon from their Equipment tab to the macro bar to provide a quick way of rolling attack or damage. Armour is dragged from the Armour heading on the Combat and Skills Tab to the Macro bar:
Spells and Priestly Powers can also be dragged to the Macro bar, and even the Consume and Rest buttons can be created as a Macro!
Most of the rolls and tests made in the system are self explanatory, especially if you are familiar with Foundry and/or AFF.
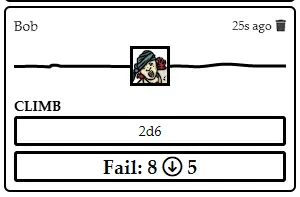
SKILL, LUCK or MAGIC can be tested by clicking on the name of the characteristic, which will be highlighted in red.

When you click on the name, a new dialogue box will open.
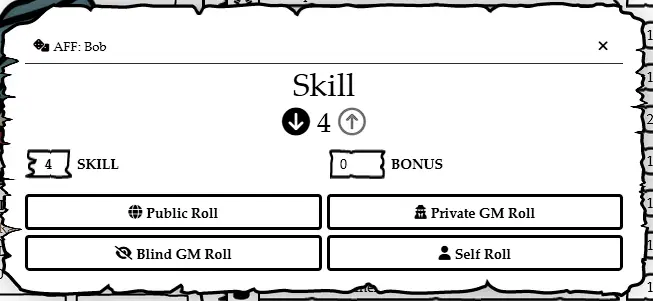
The number just below the attribute name is the effective value used for this test. If the Hero has a penalty, from wearing armour they are unskilled at for example, that will appear here. A manual modifier (positive or negative) can also be applied in the box marked “Bonus”.
The two arrows indicate whether the roll should be 2d6 under the attribute (down arrow), as for a normal special skill test, or 2d6 plus attribute, as per combat and opposed tests. The black circle/white arrow combination indicates the current roll type. Attribute and special skill tests default to roll under, whereas Attack rolls default to roll and add. To actually make the roll, click on the option at the bottom.
Public roll - reported in Chat Log for everyone to see
Blind GM roll - reported in the Chat Log for the Director only
Private GM roll - reported in the Chat Log for the player who rolled and the Director
Self Roll - reported in the Chat Log only for the player
Once the roll is made, a new item is added to the Chat Log with the name and portrait of the Hero, the Attribute or special skill being tested and, if it was roll under, whether the test succeeded.
Note: As a short cut, you can hold down the SHIFT key whilst clicking on an Attribute or special skill to make a default roll without the need for the Dialogue box. There will of course be no option to apply a modifier or change to roll and add etc.
When a combat is about to start, ensure that all combatants have been added to the Combat Tracker (right click on the token and choose the “Toggle Combat State” option - the shield and crossed swords). Because AFF uses simultaneous actions, initiative is slightly different to most games. To start, click on the dice next to each combatant, although the actual number rolled can be ignored. To ensure the combatants are dealt with in order, ask the Players what their Hero will do, and determine what the NPC enemies will do. Then manually assign an Initiative value to each combatant depending on their action:
20 - Missile Attack
15 - Magic Attack
10 - Melee Attack
5 - Anything else.
Of course, all combatants with the same Initiative will act simultaneously. Once the Round has started, the “Next Turn” button at the bottom can be used to move along the list. If a combatant will do more than one thing (such as a Combat Mage casting a spell and making a melee attack) then once they have taken their first action, their Initiative value can be re-adjusted so that they feature again in the order.
Note: To Target an enemy, the bullseye token in the icon bar can be used, or for the Director, right clicking on the token and selecting the bullseye. However, a Token can also be targeted by hovering the pointer over the Token and pressing “T”. If multiple Tokens are to be selected, hold down SHIFT before pressing “T”.t
Magical spells and attacks are resolved by making the appropriate test and then applying the effects manually as normal.
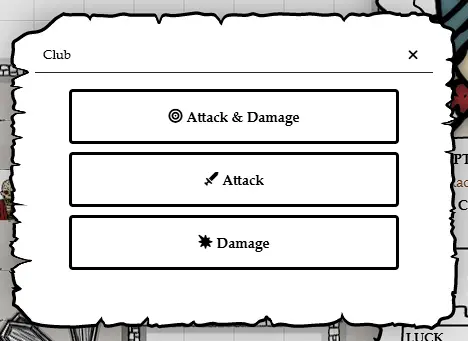
Melee attacks are initiated by either the Player or the Director. Ensure that the target(s) of the attack is Targeted, and then click on the appropriate weapon on the Combat and Skills Tab. A Dialogue box will appear asking whether you want to roll “Attack and Damage”, “Attack” or “Damage”. The first of these is very useful when you are rolling a surprise attack or one where the target cannot attack back. In general, you will want to use the “Attack” option, and this is the option that will be rolled if SHIFT-click is used on that weapon.
A Dialogue box will appear as usual, with the opportunity to apply modifiers. Once the roll is made, a dialogue box will pop up on the screen of the Target, stating that they are being attacked!
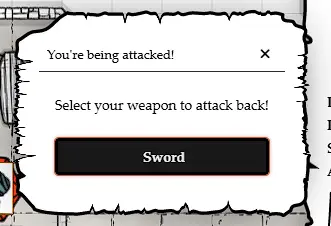
If the Target has more than one weapon equipped, they should choose one to defend themself with. Clicking on the weapon will open the usual Dialogue box, although SHIFT-click can be used here if there are no modifiers to apply. A report will now appear in the Chat Log with both Attack Totals. The winner will be in green, and the loser in red. It is of course possible for both to be red (if both combatants Fumble) or both to be green (if both Critical).
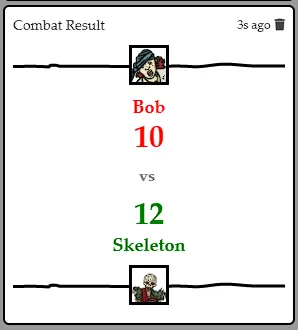
The winner should then make a Damage roll by clicking on their Weapon and the loser should make an Armour roll by clicking on the “Armour” heading.
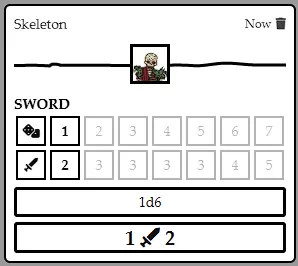
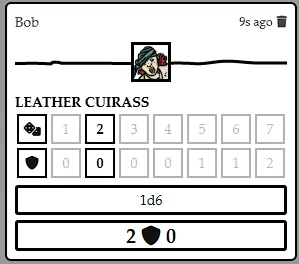
In this example, the Skeleton rolled a 1 for Damage and so inflicts 2 STAMINA. The Hero rolled a 2, and so their armour provides no protection. The Hero should reduce their STAMINA by 2 points.
If any combatant rolls a Fumble, the system will automatically roll on the Fumble table and the effects should be applied manually to the appropriate combatant.
Missile attacks use the classic method of comparing Attack Totals and so should be initiated by the attacker. These attacks also require the attacker to have sufficient ammunition to make the attack. If they have no ammunition, the following message will pop up:

Of course, if the Attacker loses, nothing more need happen, and if they win, should make a Damage roll whilst the defender makes an Armour roll.
Note: If multiple attackers are fighting one enemy, it is easier for the single combatant to initiate the combat. That way, the single combatant makes one Attack Roll, and each enemy makes their Attack Roll in return. Make sure to apply the outnumbering bonuses on the return rolls!
Casting spells is a simple process.
To cast a Minor Magic cantrip, click on the Cantrip name. A dialogue box will appear with a default roll under. This will include the +6 bonus for Minor Magic, and other situational modifiers can be applied as needed. If the casting attempt succeeds, the spell is cast. If the attempt fails, the MP of the caster will be reduced by 1.
Casting a Wizardry spell is very similar to Minor Magic, except that there is no overall +6 bonus. The MP are deducted automatically. If a Fumble is rolled, the system will automatically roll on the Oops table and report the result in the chat log as well as costing 2 MP.
Sorcery spells also require a click to open the dialogue box, and deduct STAMINA automatically, but if a component is required for that spell, will first check that the Hero has that. If not, it will give this message:

If the Component is used up by the spell, the number of components owned will drop by one. A Fumble will produce an automatic roll on the Oops table.
To use a Priestly power, simply click on it. A dialogue box will pop up asking if you are sure. As described above, the Tick next to the Power will change to a Cross, and the description of the Power will appear in the chat log. Clicking on the Power again will ask if you want to use a point of LUCK to use the Power. Once the power has been used twice, the Cross will change to an Exclamation mark. It cannot now be used until the Hero has rested, although the status can be changed manually by right clicking on the Power and selecting the Edit option.
There are several functions only a Director will want to do:
Creating a new mundane item (a warm cloak for example) is as simple as going to the “Items” tab, clicking on the “Create Item” button at the top, typing in the name of the Item and selecting “Equipment” from the drop down list. A description can be entered into the appropriate tab of the new Item and the Quantity and Prices entered in the “Attributes” tab. To modify an existing item, drag the Item to be modified from the Equipment Compendium into the Items tab and modify as desired.
To create a new Weapon, use the same “Create Item” button, but choose “Weapon” from the drop down list. A description can be entered as usual, but the weapon characteristics can be entered on the “Attributes” tab. The damage track values can be entered, along with any modifier to Attack or Damage rolls. If the “Equipped” tickbox has a yellow tick in it, the Item will be equipped when dragged on to a Hero sheet. If the “Magical” tickbox is ticked, the Weapon will be considered magical when attacking certain monsters. To set the relevant special skill, simply drag the special skill from the Compendium list to the field, after which the special skill name will appear just below the field. Similarly, if the Weapon uses ammunition, drag the appropriate Item from the Equipment compendium. An Image can be assigned by clicking on the empty space at the top left of the box and selecting an image.
Creating an Armour follows almost the same procedure as for Weapons, although there is no field for either special skill or ammunition. There is a field where you can set the required SKILL plus Armour special skill.
Creating a special skill uses the normal “Create Item” button, selecting special skill from the dropdown list. A description can be added, and the Attributes tab can be used to set which category the special skill is in, and also whether the special skill uses SKILL or MAGIC as the defining characteristic. If “Higher” is selected, the special skill will use whichever is higher between the two.
Creating a new Talent means selecting “Talent” from the drop down box after “Create Item”. This guide doesn’t cover the creation of Macro’s or Effects, so unless you already know how to do this, a Talent will be manually applied.
Creating new spells is very easy. Simply select the appropriate type of spell from the drop down list after clicking “Create Item”. Put the Description in on that tab. Then apply the specific settings as per the type of spell:
Minor: Nothing
Wizardry: Level
Sorcery: Level, Component and whether Component is consumed
Priestly: Nothing
As with Items, modifying an existing Monster is as easy as dragging the monster from the Compendium to the Actors tab, renaming it if necessary, and making any changes. Not that this does not change the characteristics of the Monster in the compendium.
To create a brand new monster or minor NPC (town guard etc), go to the “Actors” tab, and click on “Create Actor”. Choose “NPC” from the drop down box. This will create a new Actor in the tab. SKILL and STAMINA can be set in the boxes on the left (remember to set both Initial and Current). Attacks and other details can be added on the “NPC Info” tab. Weapons and Armour can be dragged in from the Compendium, and the specific details (bonus to Attack, Damage, Armour rolls etc) assigned by right clicking on the weapon or armour and choosing “Edit”. Add a description into the “Biography” tab. Lastly, click on the default monster image and assign your own image and use the three dots to set the Token image.
To create a major enemy, use “Create Actor” but choose “Anti-Hero” from the drop down list. This will create a sheet very similar to that of a Hero, but without LUCK or experience fields. This should otherwise be completed as for a Hero described above.
Critical tables
Run macro
Choose template
Choose monster
Mix & match
Manually change armour etc - spells
New Armour special skill - via settings