After starting docker, one can choose to start the prototype using dockerfile provided or login into docker instance and start the API service with the following:
pinfer app:service --reload
docker build -t streamlit .
docker run -p 8501:8501 streamlit
Based on your server's network configuration, you could map to port 80/443 so that users can view your app using the server IP or hostname. For example: http://your-server-ip:80 or http://your-hostname:443.
FROM nvidia/cuda:10.1-cudnn7-devel
ENV DEBIAN_FRONTEND noninteractive
RUN apt-get update && apt-get install -y \
    build-essential \
    software-properties-common \
    python3-opencv ca-certificates python3-dev git wget sudo  \
    cmake ninja-build && \
 rm -rf /var/lib/apt/lists/*
RUN ln -sv /usr/bin/python3 /usr/bin/python
ARG USER_ID=1000
RUN useradd -m --no-log-init --system  --uid ${USER_ID} appuser -g sudo
RUN echo '%sudo ALL=(ALL) NOPASSWD:ALL' >> /etc/sudoers
USER appuser
WORKDIR /home/appuser
ENV PATH="/home/appuser/.local/bin:${PATH}"

RUN wget https://bootstrap.pypa.io/get-pip.py && \
   python3 get-pip.py --user && \
   rm get-pip.py
RUN pip install --user tensorboard
RUN pip install --user torch==1.6 torchvision==0.7 -f https://download.pytorch.org/whl/cu101/torch_stable.html
RUN pip install --user 'git+https://github.com/facebookresearch/fvcore'
RUN git clone https://github.com/facebookresearch/detectron2 detectron2_repo

ENV FORCE_CUDA="1"

ARG TORCH_CUDA_ARCH_LIST="Kepler;Kepler+Tesla;Maxwell;Maxwell+Tegra;Pascal;Volta;Turing"
ENV TORCH_CUDA_ARCH_LIST="${TORCH_CUDA_ARCH_LIST}"
RUN pip install --user -e detectron2_repo

RUN apt-get install tesseract-ocr \
    libtesseract-dev

RUN pip install pip install "layoutparser[ocr]"

RUN git clone https://github.com/bluekidds/layout_classification.git .


RUN pip3 install -r requirements.txt

ENTRYPOINT ["streamlit", "run", "app/main.py", "--server.port=8501", "--server.address=0.0.0.0"]
conda create -n layout python=3.9
pip install streamlit
conda install -c pytorch torchvision torchaudio pytorch
brew install ffmpeg pkg-config
conda install jpeg libpng
pip install opencv-python
conda install grpcio
conda install pycocotools
pip install git+https://github.com/facebookresearch/detectron2@main
pip install av
.
├── app
│   ├── main.py
│   ├── visualize.py
│   ├── detect.py
│
├── samples
│   ├── *.png
│
- main.py: main entry point of prototype
- detect.py: functions and setup of layout classification modelling
- visualize.py: functions to visualize layout outputs in the prototype
After select the input image or upload the PDF file, one can choose a model based on the content of the images.
- Choices of Model:
- Magazine: Trained from the PrimalLayout dataset, favors magazine images, and includes 6 different classes: {1:"TextRegion", 2:"ImageRegion", 3:"TableRegion", 4:"MathsRegion", 5:"SeparatorRegion", 6:"OtherRegion"}
- NewsPaper: Trained from the NewspaperNavigator dataset, it contains 7 classes of layout mainly targeting newspapers, {0: "Photograph", 1: "Illustration", 2: "Map", 3: "Comics/Cartoon", 4: "Editorial Cartoon", 5: "Headline", 6: "Advertisement"}
- Academic Papers: Trained from the PubLayNet dataset, mostly used in academic paper and reports , it includes 5 classes:{0: "Text", 1: "Title", 2: "List", 3:"Table", 4:"Figure"}
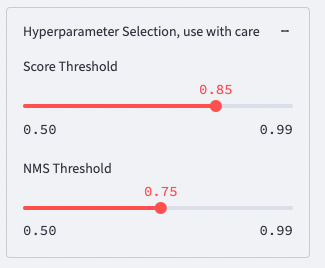
- Choice of HyperParameters:
Choose detection Score threshold and NMS threshold can effectively remove false positives or increase accuracy, use with care.