
Image Sprout is a local image-generation tool for building consistent outputs from reference images and reusable instructions.
Without a tool like this, you end up repeating the same context over and over:
- upload the same reference images again
- restate the same style direction again
- restate the same subject guidance again
- restate the same persistent instructions again
Image Sprout turns that repeated context into a project you can reuse.
It runs in two modes over the same local project data:
- a local web app for interactive setup, review, and iteration
- a CLI for shell workflows and AI agents
Most image-generation tools are prompt-first. That works for one-off outputs, but it breaks down when you need consistency.
Image Sprout gives you a project with:
- reference images
- a
Visual Style - a
Subject Guide - persistent
Instructions - sessions and runs
That lets you set up the context once, then keep generating and iterating without rebuilding it from scratch each time.
This video shows creating the project setup by adding a general reference image and deriving both the style and subject guide:

This video shows generating images from a project that already has its style and subject guide, then iterating on the results:
Install Image Sprout globally from npm:
npm install -g image-sproutIf you prefer not to install globally, you can also run it with npx image-sprout.
If you want to work from source instead, clone the repo and install dependencies locally:
git clone <repo-url>
cd image-sprout
npm install
From the repo checkout, you can run the app with the local scripts or run the built CLI directly.
If you're using an AI agent runtime, install the skill instead of the CLI:
ClawHub (OpenClaw):
npx clawhub@latest install image-sproutOr if the ClawHub CLI is already installed:
clawhub install image-sprouttmc-marketplace (Claude Code / Codex):
claude plugin add tmchow/tmc-marketplace/plugins/image-sproutManual: point your agent at the skill file directly. This won't auto-update when new versions are released.
You can use either mode.
Launch the local web app:
image-sprout webThis starts the interactive local app backed by the same on-disk store the CLI uses.
Pass --open to automatically open the app in your default browser:
image-sprout web --openPass --port to use a custom port (default is 4310):
image-sprout web --port 8080Run CLI commands directly:
image-sprout helpImage Sprout requires your own OpenRouter API key.
image-sprout config set apiKey <your-openrouter-key>Useful config commands:
image-sprout config show
image-sprout config get model
image-sprout config path
Notes:
config showandconfig get apiKeydo not print the raw API key- CLI output is text by default; pass
--jsonfor machine-readable output
Open the app with image-sprout web.
If the API key is missing, the app will prompt you to set it. You can also manage it from the settings flow inside the app.
Image Sprout defaults to Nano Banana 2 (google/gemini-3.1-flash-image-preview).
You can also add other OpenRouter models, but Image Sprout only accepts models that:
- accept text input
- accept image input
- produce image output
Use the gear icon next to the model selector.
From there you can:
- add a model by OpenRouter model id
- rename its display label locally
- set the default model
- restore the built-in defaults
image-sprout model list
image-sprout model add openai/gpt-5-image
image-sprout model set-default google/gemini-3.1-flash-image-preview
image-sprout model restore-defaultsGuide derivation uses a separate analysis model. The default is google/gemini-3.1-flash-image-preview.
To use a different model for derivation:
image-sprout config set analysisModel <openrouter-model-id>You can also override it per-command:
image-sprout project derive my-blog --target both --analysis-model google/gemini-2.5-flashThe general workflow is:
- Create a project.
- Add at least 3 reference images.
- Decide whether the project should preserve style, subject, or both.
- Derive the appropriate guide or guides.
- Generate new images from that saved project context.
Use these fields intentionally:
Visual Style: how outputs should lookSubject Guide: what subject identity should stay consistentInstructions: persistent generation instructions that should apply every time
Examples for Instructions:
- watermark requirements
- framing requirements
- text-placement requirements
- branding constraints
Open the web app and create a new project.
Best practice:
- start with at least 3 strong reference images
- use higher-quality references instead of many weak ones
- if the project needs split references, enable separate style and subject references in Project Settings
Default behavior:
- uploaded references are shared
- shared references can drive both
Visual StyleandSubject Guide
Advanced behavior:
- if needed, split references into:
- style references
- subject references
Common cases:
style only: you want consistent look, but subjects can varysubject only: you want consistent subject identity, but style can varyboth: you want both look and subject consistency
In Project Settings, derive the guides you actually need:
Derive StyleDerive SubjectDerive Style + Subject
Recommended mapping:
- style-only project: derive style
- subject-only project: derive subject
- style-and-subject project: derive both
When deriving both guides from different reference sets, both analyses run in parallel.
Review the derived text before saving it.
Project Settings does not auto-save guide edits. Save after:
- deriving guides
- editing guides manually
- updating instructions
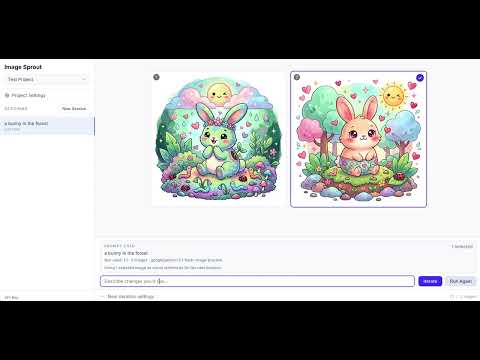
Once the project is configured, generate from the main canvas.
The main prompt is the per-run request. The image count can be 1, 2, 4, or 6.
Examples:
a flower in a forestthe same character sitting at a cafe in morning lightproduct shot on a neutral tabletop with more negative space
After a run:
- select one or more returned images to steer the next iteration visually
- describe the change you want
- use
Iterate - use
Run Againwhen you want another take on the same run without changing the prompt
image-sprout project create my-blogAdd at least 3 references. By default, refs apply to both style and subject:
image-sprout ref add --project my-blog ./ref-1.png ./ref-2.png ./ref-3.pngIf you need separate pools:
image-sprout ref add --project my-blog --role style ./style-1.png ./style-2.png
image-sprout ref add --project my-blog --role subject ./subject-1.png ./subject-2.pngimage-sprout project update my-blog --instructions "Bottom right corner should say 'My Blog' in a legible but subtle watermark."Then derive the right guide or guides.
Style only:
image-sprout project derive my-blog --target styleSubject only:
image-sprout project derive my-blog --target subjectBoth:
image-sprout project derive my-blog --target bothInspect readiness:
image-sprout project status my-blogimage-sprout project generate my-blog --prompt "a flower in a forest"Generate a single image:
image-sprout project generate my-blog --prompt "a flower in a forest" --count 1image-sprout session list --project my-blog
image-sprout run list --project my-blog
image-sprout run latest --project my-blog --jsonimage-sprout session delete --project my-blog <session-id>Deleting a session removes the session and all of its runs and generated images.
For convenience, generate and analyze are available as top-level aliases:
image-sprout generate --project my-blog --prompt "a flower in a forest"
image-sprout analyze --project my-blog --target both
These are shorthand for project generate and project derive, respectively.
Image Sprout ships skill files so AI agents can use the full workflow — project setup, reference management, guide derivation, generation, and result inspection — without additional documentation. See Install As An Agent Skill for setup.
| Runtime | Path | Distribution |
|---|---|---|
| OpenClaw / ClawHub | skills/openclaw/SKILL.md |
Published to ClawHub directly |
| Claude Code + Codex | skills/agents/SKILL.md |
Via tmc-marketplace plugin |
The CLI is the better mode for AI agents because it:
- works directly from explicit commands
- supports
--jsonfor machine-readable output - operates on the same project store as the web app
- makes project state inspectable and scriptable
Examples:
image-sprout project show my-blog --json
image-sprout project status my-blog --json
image-sprout run latest --project my-blog --jsonimage-sprout help
image-sprout project --help
image-sprout ref --help
image-sprout session --help
image-sprout model --help
image-sprout config --helpThe following config keys are available:
| Key | Description | Default |
|---|---|---|
apiKey |
OpenRouter API key | (empty) |
model |
Default generation model | google/gemini-3.1-flash-image-preview |
sizePreset |
Default image aspect ratio (16:9, 1:1, 9:16) |
16:9 |
imageCount |
Default number of images per run (1, 2, 4, 6) |
4 |
analysisModel |
Model used for guide derivation | google/gemini-3.1-flash-image-preview |
image-sprout config show
image-sprout config set <key> <value>
image-sprout config get <key>
image-sprout config unset <key>
image-sprout config pathFor local repo development:
npm installnpm run dev # Vite dev server
npm run build # Build the web app
npm run build:cli # Build the CLI
npm run web # Build web + CLI, then launch local web mode
npm run check # Svelte + TypeScript checks
npm test # Run all tests
npm run test:watch # Watch testsCLI commands -----------\
> shared on-disk project/config/model store
Local web app -----------/
Important implementation pieces:
src/cli/project-store.ts— shared disk-backed persistencesrc/cli/model-registry.ts— shared model registrysrc/cli/web-server.ts— local bridge for the web appsrc/lib/api/openrouter.ts— generation and guide derivationsrc/lib/stores/*.svelte.ts— bridge-backed web state
- Svelte 5
- TypeScript
- Tailwind CSS v4
- Vite
- OpenRouter
- Vitest